The Cerezo en Flor Cardigan
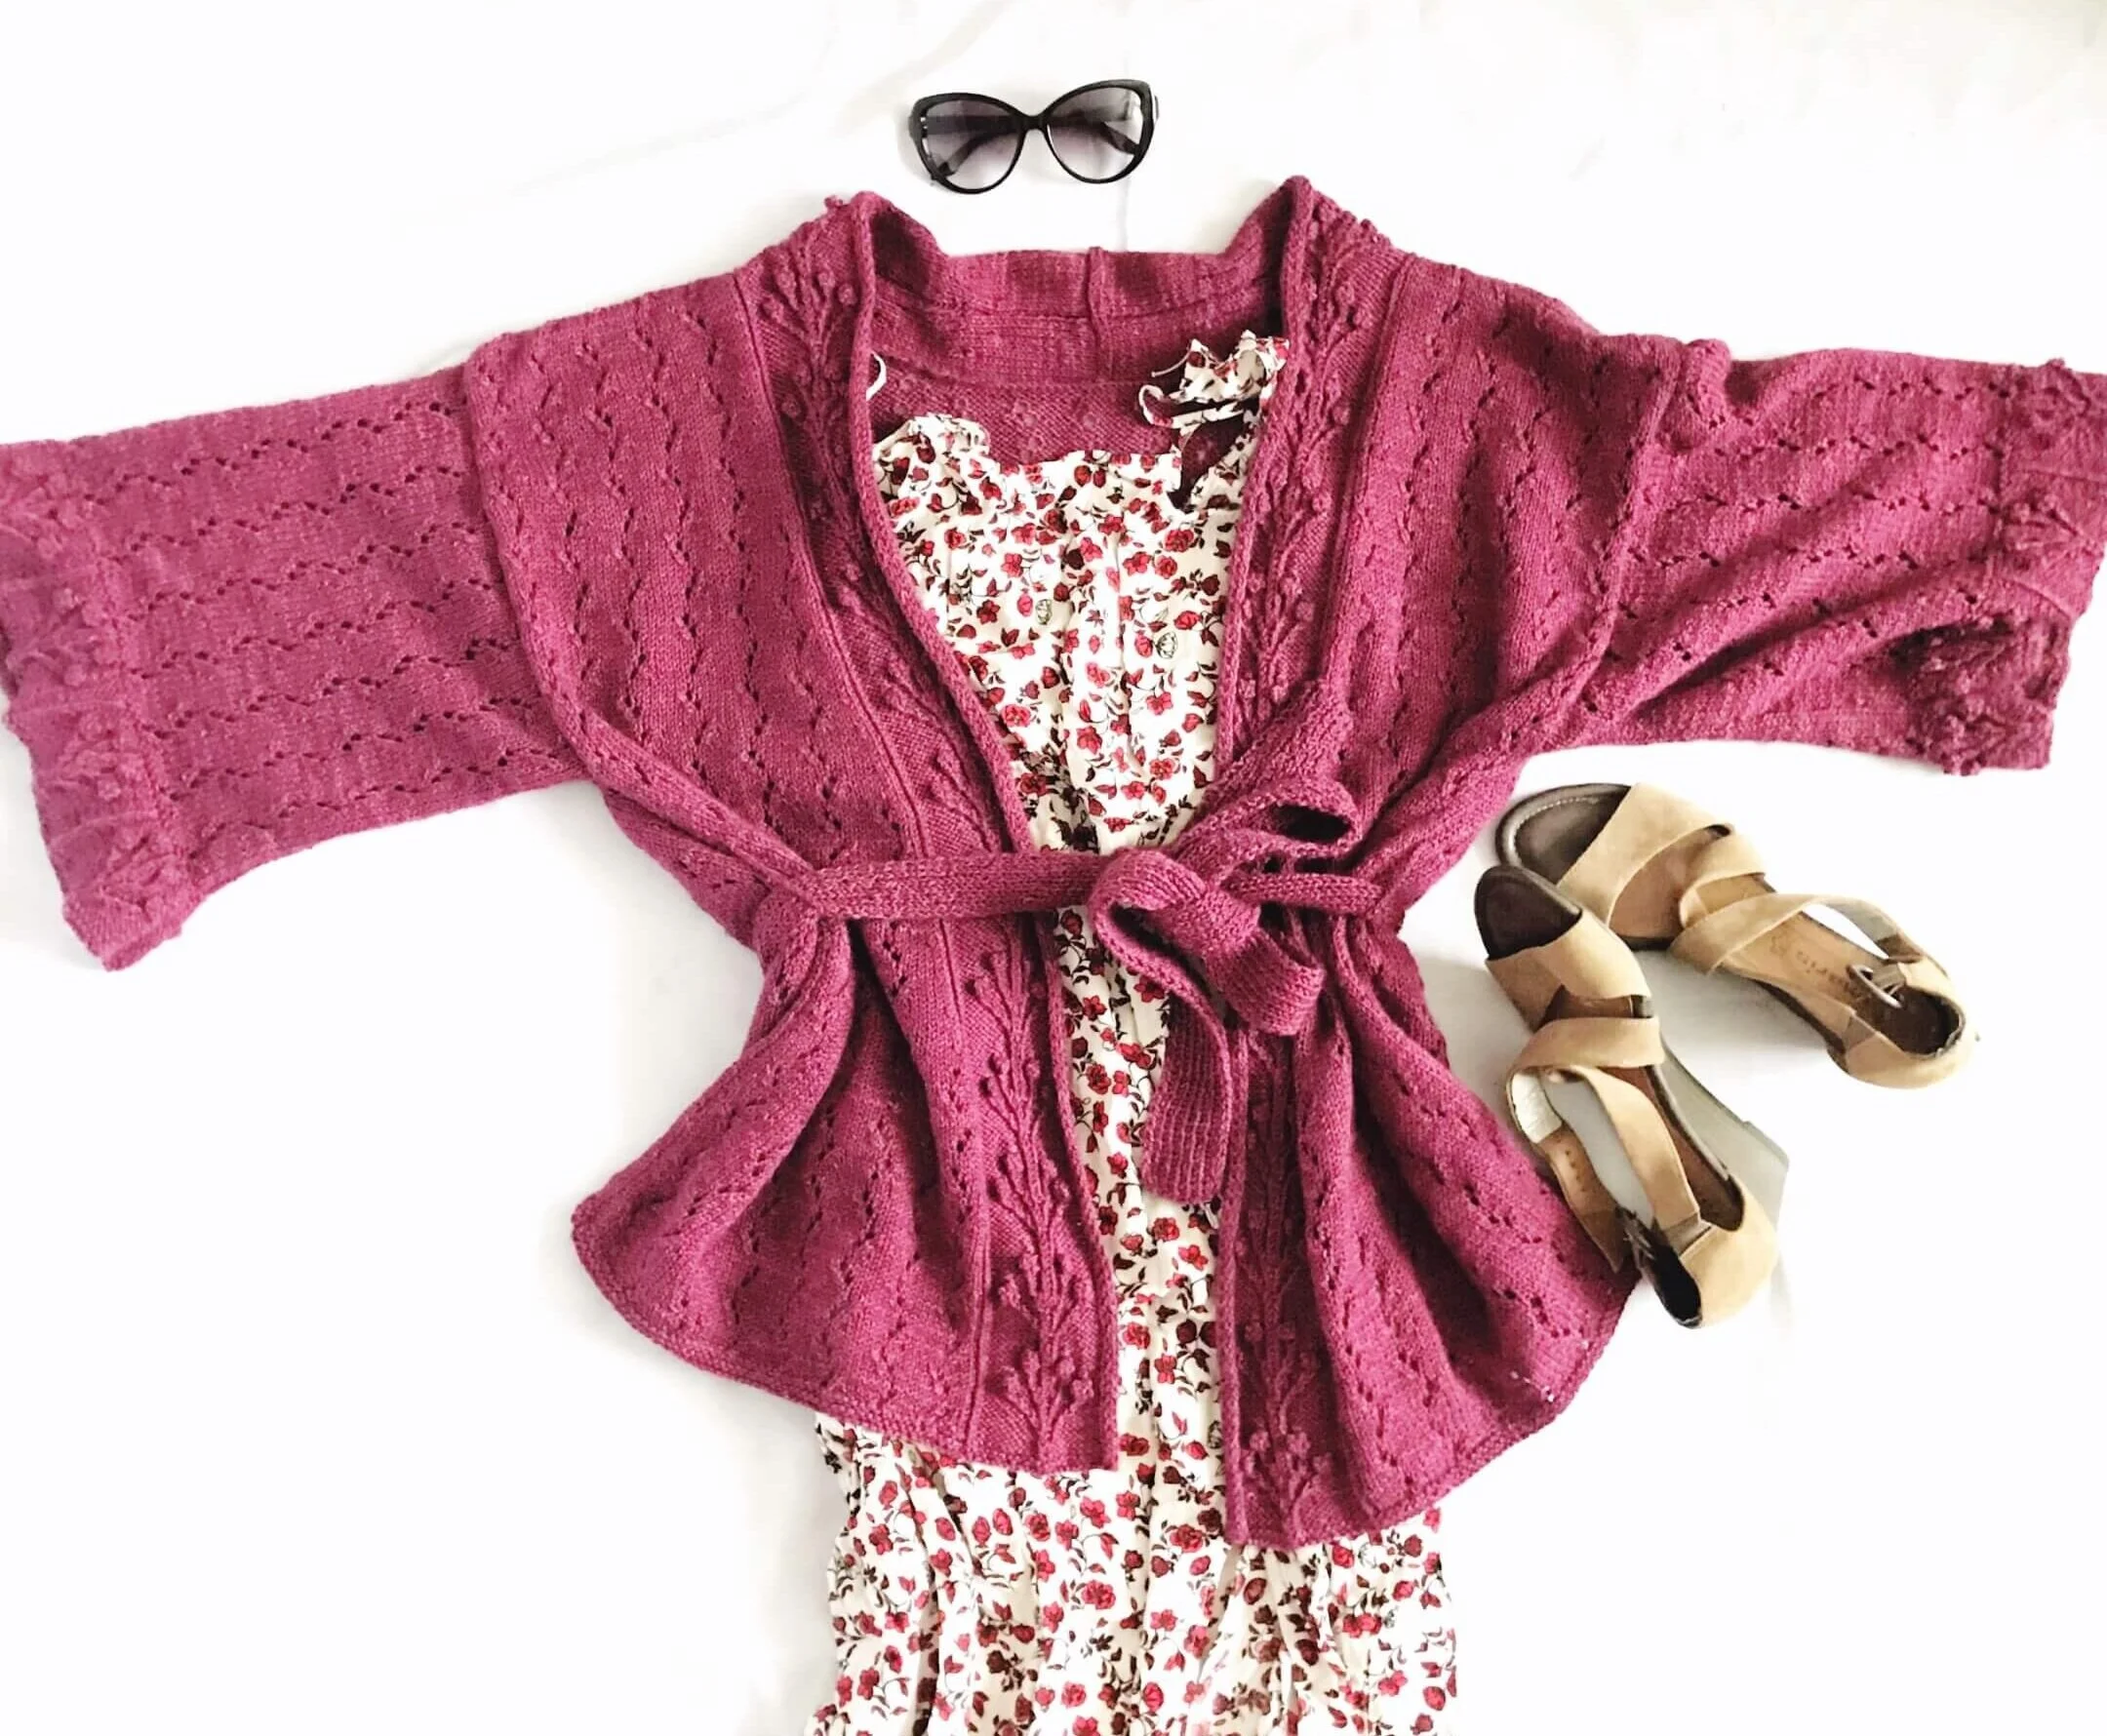
An intermediate-friendly knitted cardigan – my Cerezo en Flor Cardigan – is a free pattern here on the blog! Read through my inspiration, materials and stitch patterns used. Or scroll on down for the free pattern.
Introduction + Design
Cherry blossoms flow through Japan in the early spring, bringing their delicate sweet scent and the promise of warmer days ahead. Inspired by cherry blossoms, Cerezo en Flor Cardigan is perfect to slip into when it is too warm for a jacket, but the air still holds a hint of winter.
Cerezo en Flor is worked flat from the bottom up in six separate pieces and seamed together, creating a figure-flattering kimono shape. The two front pieces attach at the back shoulders. Stitches for the narrow pretty neckband are picked up and worked independently along the inner edges. They join at the center back and are sewn to the back panel neckline. The delicate drop shoulder sleeves attach to the body as they are in traditional kimono. The under sleeve is sewn and the stitching continues down the sides to the band.
Perfect to lounge at home or to dress up a sundress in Summer
This kimono-style cardigan is so versatile you’ll want to wear it everywhere! Is it chilly at home? Slip it on and you’ll feel like a movie star. Going out on a date? Wear it and you’ll be as flirty as ever, ready to conquest everyone’s heart!
Sizes for everyone!
This cardigan fits bust sizes from 32 (but really, even 30) to 62 inches, due to the intended ease which is meant to be worn with! The relax fit is so liberating, and combined with the ultra feminine stitches, it’s the perfect combination.
Looking to become a better knitter?
Then this pattern is ideal! It has no shaping except in the fronts’ neckline, so you can focus on the stitches that make this cardigan so special, the Eyelet Zigzag stitch and the Cherry Blossom stitch. Don’t worry, I’ll explain how to work them. The Cherry Blosson stitch is a Japanese knitting stitch, so there are some new techinques that you can learn!
Pattern
Get the ad-free, large print, printable PDF pattern HERE on Ravelry or HERE on Etsy.
PIN this pattern to your Pinterest boards for later HERE.
Techniques Required
Knit & purl, cast-on and bind-off Increasing and decreasing
Cast-on: Long-tail cast-on
Specialty bind-off: sloped bind-off for back neck
Bobbles: worked with crochet hook Basic crochet stitches
Lace
Crossing stitches
Working from charts or written instructions Picking up stitches
Blocking
Seaming: mattress stitch.
Yarn
11 (13, 14, 16) balls of The Fibre Co. Acadia DK weight yarn (1.76 oz/50 g; 145 yds/133 m; 60% wool/20% alpaca/20% silk). Colorway: Rosebay.
Or
Approximately 16.9 (21.5, 24.5, 28.5) oz/478 (610, 695, 810) g; 1390 (1777, 2023, 2355) yds/1270 (1624, 1850, 2154) m of DK weight yarn (60% wool/20% alpaca/20% silk).
Materials
Needles
Size US 6 (4 mm) 24 in (60cm) circular knitting needles for working flat or size to obtain correct gauge.
Notions
Size G-US 6 (4 mm) crochet hook.
Cable needle.
2 stitch holders or waste yarn.
Tapestry needle.
Gauge
22 sts and 32 rows = 4 in (10 cm) square in Eyelet Zigzag stitch with size US 6 (4 mm) needles after blocking.
Take the time to save time! Please knit a gauge swatch to check your gauge.
Sizes
Women's Bust size 32-38 (40-46, 48-54, 56- 62) in.
Model shown in size 40-46 in with 13 in (35 cm) positive ease.
Finished Measurements
Bust at underarm: 46 (54, 62, 70) in/117 [137, 158, 178] cm.
Finished Length: 24 1⁄4 (25 1⁄4 ,26 1⁄4, 27) in/62 [64.1, 66.7, 68.6] cm.
Ease intended: positive, approximately 15.5 in/39.4 cm.
Notes
I am a loose knitter. If you are a tight knitter, I advise you to try knitting a gauge swatch with one needle size bigger than stated in pattern.
The cardigan is worked flat, so the circular needle is used to accomodate the large amount of stitches in the back.
When binding off sts for the neck in the back, use the sloped bind-off for a clean finished edge.
Abbreviations
BO: bind off
CO: cast on
k: knit st
ch: chain
k2tog: knit 2 together
ktbl: knit through the back loop. kwise: knitwise, as if to k the st LN: left-hand needle
1/1 LT: One over one, Left Twist
1/2 LPT: One over two, Left Purl Twist 1/1/1 LPT: One over one over one, Left Purl Twist
MB: make bobble
p: purl st
psso: pass slipped stitch over
ptbl: purl through the back loop.
Pwise: purlwise, as if to p the st
Rep: repeat
RN: right-hand needle
1/1 RT: One over one, Right Twist.
1/2 RPT: One over two, Right Purl Twist 1/1/1 RPT: One over one over one, Right Purl Twist
RS: Right Side
sl: slip st
sl st: slip stitch, crochet.
skp: slip, knit, pass over
ssk: slip, slip, knit
st(s): stitch(es)
tbl: through back of loop (st)
WS: wrong Side
wyib: with yarn in back
wyif: with yarn in front
yo: yarn over
Techniques
Knit 2 together: insert the needle through the front loops of the first 2 sts on the LN and k them together as if they were 1 st.
Make Bobble: knit into front, back and front of next st — 3 sts. Turn your work so WS is facing and p these 3 sts. Turn and k. Turn work to WS and p. Turn so the RS is facing and sl 1, k2tog, psso to complete bobble.
1/1/1 RPT: (One over one over one, Right Purl Twist) Created with 3 stitches. Slip next 2 stitches to cable needle and place at back of work, k1 tbl, slip left-most stitch from cable needle to LH needle, move cable needle with remaining stitch to front of work, p1 from LH needle, then k1 tbl from cable needle.
1/1/1 LPT: (One over one over one, Left Purl Twist) Created with 3 stitches. Slip next stitch to cable needle and place at front of work, slip next stitch to second cable needle and place at back of work, k1 tbl, p1 from back cable needle, then k1 tbl from front cable needle.
1/2 RPT: (One over two, Right Purl Twist) Created with 3 stitches. Slip next 2 stitches to cable needle and place at back of work, k1 tbl, then p2 from cable needle.
1/2 LPT: (One over two, Left Purl Twist) Created with 3 stitches. Slip next stitch to cable needle and place at front of work, p2, then k1 tbl from cable needle.
1/1 RT: (One over one, Right Twist) Created with 2 stitches. Slip next stitch to cable needle and place at back of work, k1 tbl, then k1 tbl from cable needle.
1/1 LT: (One over one, Left Twist) Created with 2 stitches. Slip next stitch to cable needle and place at front of work, k1 tbl, then k1 tbl from cable needle.
Slip st: slip st to the RN pwise, unless instructed otherwise.
Slip, knit, pass over: sl st to the RN pwise, k the next st, pass the slipped st over the st you just knit.
Slip, slip, knit: sl next 2 sts to the RN, one by one, kwise. Slide the LN into the front loops of the slipped sts and knit them together.
Sloped bind-off: this bind off forms a smooth curve and prevents “stair steps” to form on the following bind-off rows. Work the first bind-off row as usual to define the initial part of the bind-off. Next row, work even to the last st, but do not work. Turn work so that last st on LN becomes the first st on the RN. Keeping the yarn in the back of the work, slip the unworked st onto the LN pwise, then bind off the st by lifting it over the first st on LN. It looks like the st has a “collar” at it's base. Now, slip that collared first st pwise to the RN without working it and work even across the row. This is your first sloped bind-off st. Keep working in this way until you have completed all bind-off rows.
Through the back loop: work the stitch through the back loop, instead of through the front loop, as regular.
Stitch Patterns
Garter st.
RS and WS rows: knit.
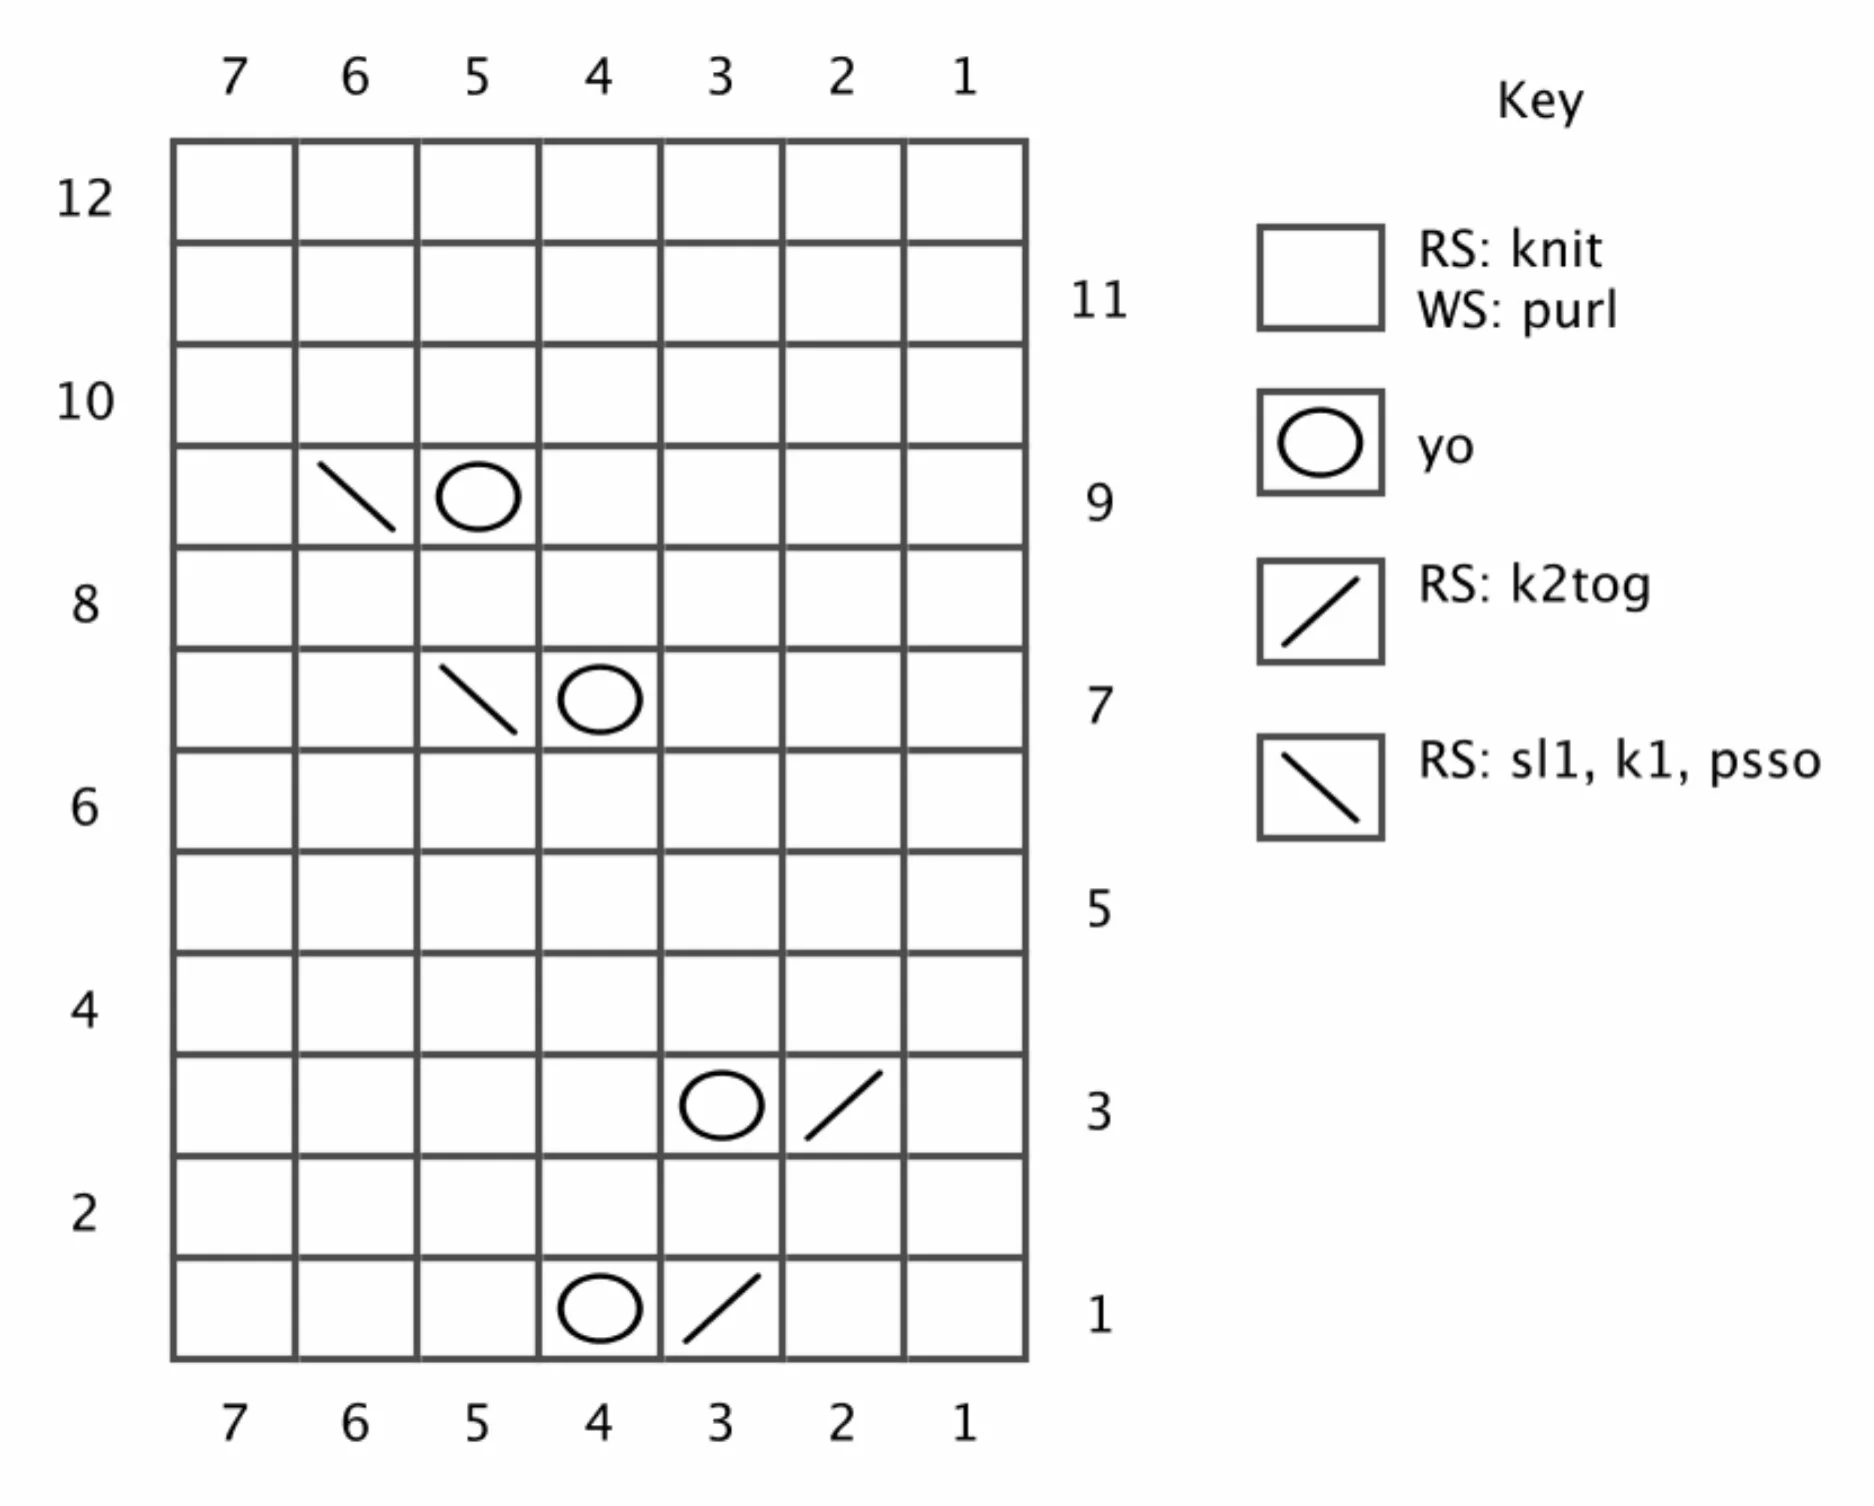
Eyelet ZigZag st.
(Multiple of 7 sts)
Row 1 (RS): *k2, k2tog, yo, k3; rep from * to end of row.
Row 2 and all WS rows: p all sts.
Row 3: *k1, k2tog, yo, k4; rep from * to end of row.
Row 5: k all sts.
Row 7: *k3, yo, skp, k2; rep from * to end of row.
Row 9: *k4, yo, skp, k1; rep from * to end of row.
Row 11: k all sts.
Row 12: p all sts.
Repeat rows 1 - 12 for the Eyelet ZigZag st.
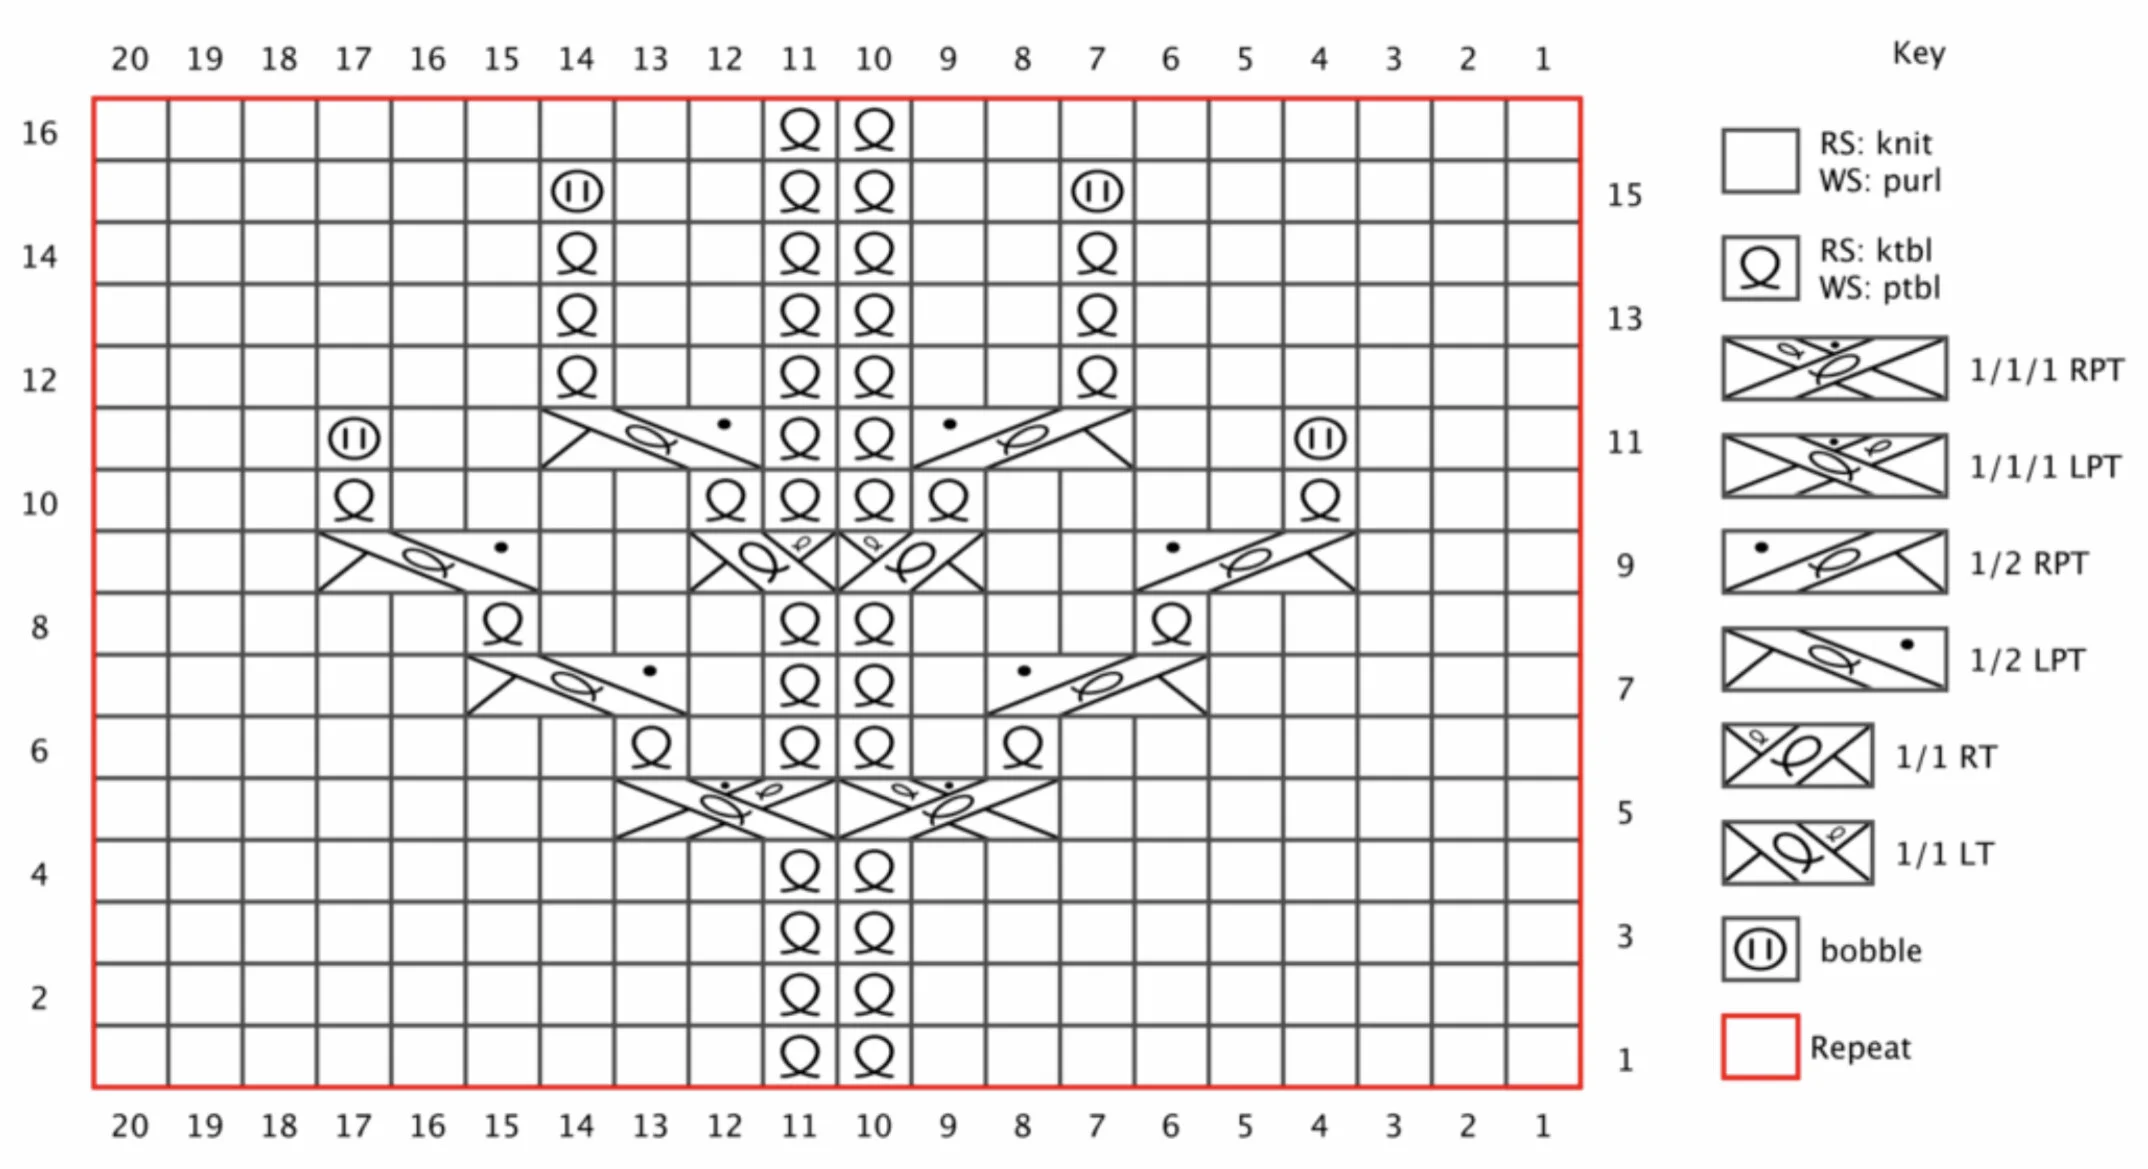
Cherry Blossom st.
(Multiple of 20 sts)
Row 1 (RS): p9, ktbl x 2, p9.
Row 2 (WS): k9, ptbl x 2, k9.
Rows 3 - 4: repeat rows 1 - 2.
Row 5: p7, 1/1/1 RPT, 1/1/1 LPT, p7.
Row 6: k7, ptbl, k1, ptbl x 2, k1, ptbl, k7. Row 7: p5, 1/2 RPT, p1, ktbl x 2, p1, 1/2 LPT, p5.
Row 8: k5, ptbl, k3, ptbl x 2, k3, ptbl, k5. Row 9: p3, 1/2 RPT, p2, 1/1 RT, 1/1 LT, p2, 1/2 LPT, p3.
Row 10: k3, ptbl, k4, ptbl x 4, k4, ptbl, k3. Row 11: p3, MB, p2, 1/2 RPT, ktbl x 2, 1/2 LPT, p2, MB, p3.
Row 12: k6, ptbl, k2, ptbl x 2, k2, ptbl, k6. Row 13: p6, ktbl, p2, ktbl x 2, p2, ktbl, p6. Row 14: repeat row 12.
Row 15: p6, MB, p2, ktbl x 2, p2, MB, p6.
Row 16: repeat row 2.
Repeat rows 1 - 16 of Cherry Blossom st.
Schematics
Let’s knit!
Back
Using size US 6 (4 mm) needles and the Long-tail CO method, CO 128 (149, 170, 191) sts.
Row 1 (RS): k all sts.
Row 2 (WS): k all sts.
Work even in Garter st for 2 more rows, ending by working a WS row. Next, we begin Eyelet Zigzag St.
Begin the Eyelet Zigzag st
Row 1 (RS): k1, [work row 1 of Eyelet Zigzag] 18 (21, 24, 27) times. K1.
Next row (WS) and all WS rows: p all sts.
Continue working the next 10 rows of Eyelet Zigzag st as established for your size. Rep Eyelet Zigzag st until Back measures 21 1⁄4 (22 1⁄4, 23 1⁄4, 24) in (54 [56.5, 59, 61] cm) from CO, ending by working a WS row.
Neckline and Shoulder shaping
Right Shoulder
Next row (neck BO, RS): k1, work 52 (62, 72, 82) sts in Eyelet ZigZag st pattern for the right shoulder, BO 24 (25, 26, 27) sts, work in Eyelet ZigZag st pattern to the last st, k1. — The back is now divided in two pieces, the right and left shoulders on one needle. There are 52 (62, 72, 82) sts in each shoulder. When able, place the 52 (62, 72, 82) sts of the right shoulder on a st holder or scrap of yarn, and set them aside to work later. Continue working the sts for the left shoulder as below.
Left Shoulder
All WS rows are worked as p.
Next row (WS): p all sts to last st. Turn. Next row (RS): use the Sloping BO method for shaping. BO 3 sts at the beginning of the next 2 (3, 3, 6) RS rows while still maintaing the established Eyelet Zigzag st pattern. Then, 2 sts at the beginning of the next 9 (8, 8, 5) RS rows, working in the established Eyelet Zigzag st pattern — 28 (37, 47, 54) sts remain.
Work even in the established Eyelet Zigzag st pattern until piece measures 24 1⁄4 (25 1⁄4, 26 1⁄4, 27) in (62 [64.1, 66.7, 68.6] cm) from CO, ending by working a WS row. BO all sts.
Next we shape the right shoulder.
Right Shoulder
With RS facing and starting at the neck edge side, pick up the sts for the right shoulder by placing them back on your needle. The ball yarn attaches at the beginning of the first RS row on the outer edge.
Next row (RS): work even across row while maintaining the established Eyelet Zigzag st pattern until the last st. Turn without working it.
Next row (WS): use the Sloping BO method for shaping. BO 3 sts at the beginning of the next 2 (3, 3, 6) WS rows and 2 sts at the beginning of the next 9 (8, 8, 5) WS rows, and work the remaining sts in pattern — 28 (37, 47, 54) sts.
Work even in the established Eyelet Zigzag st pattern until piece measures 24 1⁄4 (25 1⁄4, 26 1⁄4, 27) in (62 [64.1, 66.7, 68.6] cm) from CO, ending by working a WS row. BO all sts.
Left Front
CO 68 (82, 96, 103) sts.
Row 1 (RS): k to last 3 sts; k1, sl 1 wyif, p1. Row 2 (WS): sl 1 wyib, k, sl 1 wyif; k to end. Work even in the stablished selvedge and Garter st for 2 more rows, ending by working a WS row.
Begin the Eyelet Zigzag st and Cherry Blossom st
Next row (RS): k1, [work row 1 of Eyelet Zigzag] 6 (8, 10, 11) times; place marker, p1, ktbl. Work row 1 of Cherry Blossom st, k1, sl 1 wyif, p1.
Next row (WS) and all WS rows: sl 1 wyib, k, sl 1 wyif; k the k sts, ptbl the p sts until the marker; sl marker, p as normal to end.
Note: the Eyelet Zigzag st is a rep of 12 rows, and the Cherry Blossom st is a rep of 16 rows.
Continue working the Eyelet Zigzag st and the Cherry Blossom st in this way through rows 12 and 16, respectively, slipping the marker once you reach it. Then rep rows 1 - 12 for the Eyelet Zigzag st and rows 1 - 16 for the Cherry Blossom st until piece measures 7 3⁄4 (8, 8, 8 1⁄2) in/19.7 (20.3, 20.3, 21.6) cm from CO, ending by working a WS row. Continue to neckline shaping.
Neckline shaping
Next (decrease) row (RS): k1, work in Eyelet Zigzag st pattern to 3 sts before the marker, k2tog, k1, sl marker, p1, ktbl. Work in Cherry Blossom st pattern, k1, sl 1 wyif, p1. (1 st decreased) — 67 (81, 95, 102) sts.
Repeat the Decrease Row every 4th row 0 (4, 12, 11) times more, then every 6th row 7 (16, 12, 13) times more, and every 8th row 8 (0, 0, 0) times more. — 53 (62, 72, 79) sts.
Work even until piece measures 24 1⁄4 (25 1⁄4,26 1⁄4, 27) in/62 (64.1, 66.7, 68.6) cm from cast-on, ending by working a WS row. BO 28 (37, 47, 54) sts, and place the remaining 25 sts on a st holder or scrap yarn, and put them aside to work them later.
Note: write down in which row of the Cherry Blossom st you stopped, for future reference.
Right Front
CO 68 (82, 96, 103) sts.
Row 1 (RS): sl 1 wyib, sl 1 wyif, k1; k to end. Row 2 (WS): k to last 3 sts; sl 1 wyif, k1, p1. Work even in the stablished selvedge and Garter st for 2 more rows, ending by working a WS row.
Begin the Eyelet Zigzag st and the Cherry Blossom st
Next row (RS): sl 1 wyib, sl 1 wyif, k1. Work row 1 of the Cherry Blossom st, ktbl, p1, place marker. Work row 1 of the Eyelet Zigzag st pattern 6 (8, 10, 11) times, k1. Next row (WS) and all WS rows: p all sts until marker, sl marker. Ptbl the p sts, k the k sts to last 3 sts; sl 1 wyif, k1, p1.
Continue working the Eyelet Zigzag st and the Cherry Blossom st in this way through rows 12 and 16, respectively; slipping the marker once you reach it. Then rep rows 1 - 12 for the Eyelet Zigzag st and rows 1 - 16 for the Cherry Blossom st until piece measures 7 3⁄4 (8, 8, 8 1⁄2) in/19.7 (20.3, 20.3, 21.6) cm from CO, ending by working a WS row.
Neckline shaping
Next (decrease) row (RS): sl 1 wyib, sl 1 wyif, k1. Work in Cherry Blossom st, ktbl, p1, sl marker. K1, ssk, work in Eyelet Zigzag st pattern to last st, k1. (1 st decreased) — 67 (81, 95, 102) sts.
Repeat the Decrease Row every 4th row 0 (4, 12, 11) times more, then every 6th row 7 (16, 12, 13) times more, and every 8th row 8 (0, 0, 0) times more. — 53 (62, 72, 79) sts.
Work even until piece measures 24 1⁄4 (25 1⁄4 ,26 1⁄4, 27) in/62 (64.1, 66.7, 68.6) cm from CO, ending by working a WS row. Place the next 25 sts on a st holder or scrap yarn, and put them aside to work them later; BO 28 (37, 47, 54) sts.
Note: write down in which row of the Cherry Blossom st you stopped, for future reference.
Sleeves
Repeat these instructions twice to make 2 sleeves.
CO 148 (169, 190, 211) sts.
Row 1 (RS): k all sts.
Row 2 (WS): k all sts.
Work even in Garter st for 2 more rows, ending by working a WS row.
Begin the Cherry Blossom St
Next row (RS): k1, *work row 1 of the Cherry Blossom st, ktbl*; rep from * to * 6 (7, 8, 9) times more, until 21 sts left on LN. Work row 1 of the Cherry Blossom st, k1. Row 2 and all WS rows: k the k sts, ptbl the p sts.
Continue working the Cherry Blossom st in this manner through to row 16.
Next (decrease) row (RS): k2, *k2tog; rep from * 13 (15, 18, 21) times more. **k2, k2tog**; rep from ** to ** 21 (24, 27, 29) times more. K2, *k2tog; rep from * 14 (16, 18, 21) times. K2 (3, 2, 3). — 98 (112, 125, 138) sts.
Next row (WS): k all sts.
Begin the Eyelet Zigzag st
Next row (RS): k3 (3, 3, 2), rep row 1 of the Eyelet Zigzag st pattern until last 4 (4, 3, 3) sts, k4 (4, 3, 3).
Next row (WS) and all WS rows: p all sts. Continue working the Eyelet Zigzag st in this fashion through to row 12. Then rep rows 1 - 12 until piece measures 17 (16, 14 3⁄4, 15 3⁄4) in/43.2 (40.6, 37.5, 40) cm from CO, ending by working a WS row.
BO all sts.
Belt
CO 15 sts.
Row 1 (RS): sl 1 wyib, *k1, p1; rep from * to last 2 sts, k2.
Row 2 (WS): sl 1 wyif. P the p sts and k the k sts to last st, p1.
Rep Rows 1 and 2 until piece measures 63 (63, 73, 73) in/160 (160, 185, 185) cm. BO all sts.
Finishing
Block pieces to measurements using the “wet block” method. Align the back and right front with the RS facing up, and sew the right shoulder seam. Repeat for left front.
Back Neckband
Pick the 25 sts that you left on hold from the left front and the RS facing you, work as follows:
Next row (RS): k1, ktbl, work the row you noted as leaving off at of the Cherry Blossom st, k1, sl 1 wyif, p1.
Next row (WS): sl 1 wyib, k1, sl 1 wyif; k the k sts, ptbl the p sts to last st, p1.
Continue working in the established pattern until you have completed 3 more 16 rows repeats of the Cherry Blossom st.
Next row (RS): k1, ktbl, p9, ktbl x 2, p9, k1, sl 1 wyif, p1.
Next row (WS): sl 1 wyib, k1, sl 1 wyif; k the k sts, ptbl the p sts to last st, p1.
Continue working in the last 2 rows until the piece fits along one half of the back neck. BO all sts.
Work the sts on the right front with the RS facing you as follows:
Next row (RS): sl 1 wyib, sl 1 wyif, k1; work the row you noted as leaving off at of the Cherry Blossom st, ktbl, k1.
Next row (WS): p1, ptbl, k the k sts, ptbl the p sts to last st; sl 1 wyif, k1, p1.
Continue working in the established pattern until you have completed 3 more 16 rows repeats of the Cherry Blossom st.
Next row (RS): sl 1 wyib, sl 1 wyif, k1, p9, ktbl x 2, p9, ktbl, k1.
Next row (WS): p1, ptbl, k the k sts, ptbl the p sts to last st; sl 1 wyif, k1, p1.
Continue working in the last 2 rows until the piece fits along one half of the back neck. BO all sts.
Sew the neck band BO edges together. Next, sew the side of the back of neckband along the back of neck edge. Lay cardigan flat with RS facing up and pin the center of sleeve BO edge to the sewn shoulder seam. Pin each corner of the sleeve to the corresponding body edge, taking care that the corners will line up when cardigan is folded at the shoulder seam, with WS facing. Pin body side edges so bands edge, armhole edge and the cuff of sleeve edge all line up. Sew sleeves from cuff to armholes, and down side of body to bottom edge. Repeat for other side. Tip: pin both sleeves to body before folding garment at shoulder seam.
Belt Loops
With the RS of the cardigan facing up, measure 8 1⁄4 (8 1⁄2 , 8 1⁄2, 9) in (21 [21.6, 21.6, 23] cm) from the CO edge on the right side seam. Mark it, and take a strand of yarn. Make a slip knot and place it on the crochet hook. Join the strand of yarn to the cardigan where you marked it with a sl st, and ch for about 2 1⁄2 in (7 cm). Sl st to join the chs 2 in (5 cm) above the first sl st on the side seam. Repeat for the second loop on the left side seam.
Weave in ends.
And now your Cerezo en Flor Cardigan is ready for you to rock it!
You can share your handknits with the KBD community tagging me and using the hashtags #CerezoenFlorCardigan and #katebarriosdesigns
Credits
Tech Editor: NiN Tech Edits
Test Knitter(s): Sigrún Arna, Kathryn Beyers
Copyrights
Copyright Kate Barrios Designs, 2021. You are welcome to sell finished items of this pattern, but please give credit to my design linking my website and social media.
You are not allowed to alter this pattern and sell a similar one.
Version 3, December 2020.


